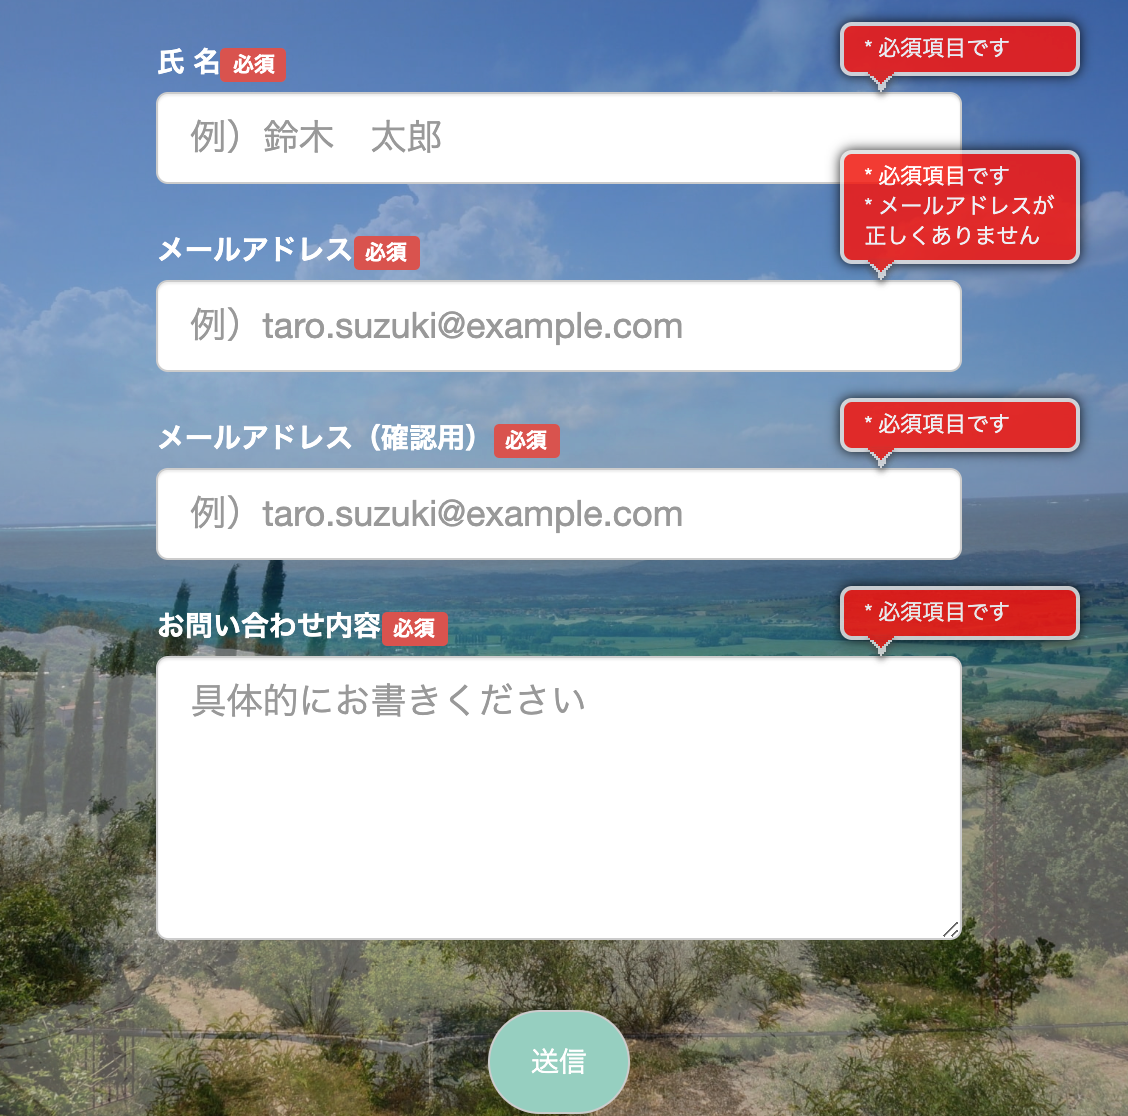
本日はValidationと言うプラグインについての説明です。
筆者は現在インラインスクールでプログラミングを勉強中です。
オリジナルサイトをつくっているのですが、
メールフォームのエラーチェックするのに便利なプラグインjQuery Validation Engineを見つけたので、
このブログに書きたいと思います。
このプラグインはリアルタイムでエラーをチェックしてくれるので、入力漏れを絶対に防ぐことができると思います。
あと、空白だったり、違った内容が入っていると、送信ボタンを押した時にスクロールしてエラー箇所に戻ってくれます。
では、早速説明していきます。
スポンサードサーチ
Validationの使い方
まずは、jQueryをCDNで読み込みます。
<!-- jquery -->
<script src="https://code.jquery.com/jquery-2.2.4.min.js" integrity="sha256-BbhdlvQf/xTY9gja0Dq3HiwQF8LaCRTXxZKRutelT44=" crossorigin="anonymous"></script>
次にGitHubで必要なファイルをダウンロードします。
必要ファイル名
- jquery.validationEngine.js
- jquery.validationEngine-ja.js
- validationEngine.jquery.css
 <script src="js/jquery.validationEngine.js"></script>
 <script src="js/jquery.validationEngine-ja.js"></script>
 <link rel="stylesheet" href="css/validationEngine.jquery.css">
ダウンロードしたファイルを読み込みます。
次にmain.jsで、
$(document).ready(function() {
jQuery("#form_1").validationEngine();
});
と、記述します。main.jsはこれだけです。
idは#form_1としているので、HTMLのformタグにidを追加しましょう。
<form action="send.php" class="form-horizontal" id="form_1" method="POST">
                    <!-- form-groupが1行(row)を表す -->
                    <div class="form-group">
                        <label class="col-sm-3 control-label text-center">氏  名<span class="label label-danger">必須</span></label>
                        <div class="col-sm-9 text-center">
                            <input type="text" class="form-control input-lg validate[required]" name="firstname" placeholder="例)鈴木 太郎">
                        </div>
                    </div>

                    <div class="form-group">
                        <label class="col-sm-3 control-label text-center">メールアドレス<span class="label label-danger">必須</span></label>
                        <div class="col-sm-9 text-center">
                            <input type="text" class="form-control input-lg validate[required,custom[email]]" id="password" name="email" placeholder="例)taro.suzuki@example.com">
                        </div>
                    </div>
                    <div class="form-group">
                        <label class="col-sm-3 control-label text-center">メールアドレス(確認用)<span class="label label-danger">必須</span></label>
                        <div class="col-sm-9 text-center">
                            <input type="text" class="form-control input-lg validate[required,equals[password]]" name="email2" placeholder="例)taro.suzuki@example.com">
                        </div>
                    </div>
                    <div class="form-group">
                        <label class="col-sm-3 control-label text-center">お問い合わせ内容<span class="label label-danger">必須</span></label>
                        <div class="col-sm-9 text-center">
                            <textarea class="form-control input-lg validate[required]" rows="5" name="memo" placeholder="具体的にお書きください"></textarea>
                        </div>
                    </div>

                    <div class="form-group">
                        <div class="col-sm-12 text-center">
                            <input type="submit" class="btn btn-default" type="submit"></input>
                        </div>
                    </div>

                </form>
上記のようにformタグにid=”form_1″を記述します。
あとは、inputタグのclassにオプションを書き加えていきます。
上のコードの例だと、
- 氏名
- メールアドレス
- メールアドレス
- お問い合わせ内容
なので、
上から順番に
- validate[required]:必須入力項目
- validate[required,custom[形式]]:形式チェック+必須入力項目
- validate[required,equals[password]]:必須入力項目+上記のメールアドレスと一致しているか
- validate[required]:必須入力項目
となっています。
classに付け加えるだけなので、便利すぎますね。
エラーがあるとエラー部分までスクロールして戻ってくれるのも魅力的です。
これ以外にもまだオプションがありますので
jQuery-Validation-Engineのサンプル
も参考にしてみてください。

出来上がりこんな感じになります。
ぜひ
簡単なのでぜひ使ってみてください。
今度も初心者でも簡単に使えるようなプラグインなど紹介していく予定なので
よろしくお願いします。
以上です。


